Access Schedules are used to limit access to the doors & locks a user or guest is given access to.
For example, an employer may create a schedule for Monday - Friday from 9 AM to 5 PM each day. Selecting this schedule for the Access User would send this schedule to the lock as part of their credential. When this user's pin number is entered on the lock, the door will only unlock if within the parameters of the schedule.
You will also learn how to create an Access Exception and reasons as to why you may need to create one.
In this article:
Creating an Access Schedule
- Log into your RemoteLock Web Portal
- Select the Access Tab at the top of the page, then select “Access Schedule”

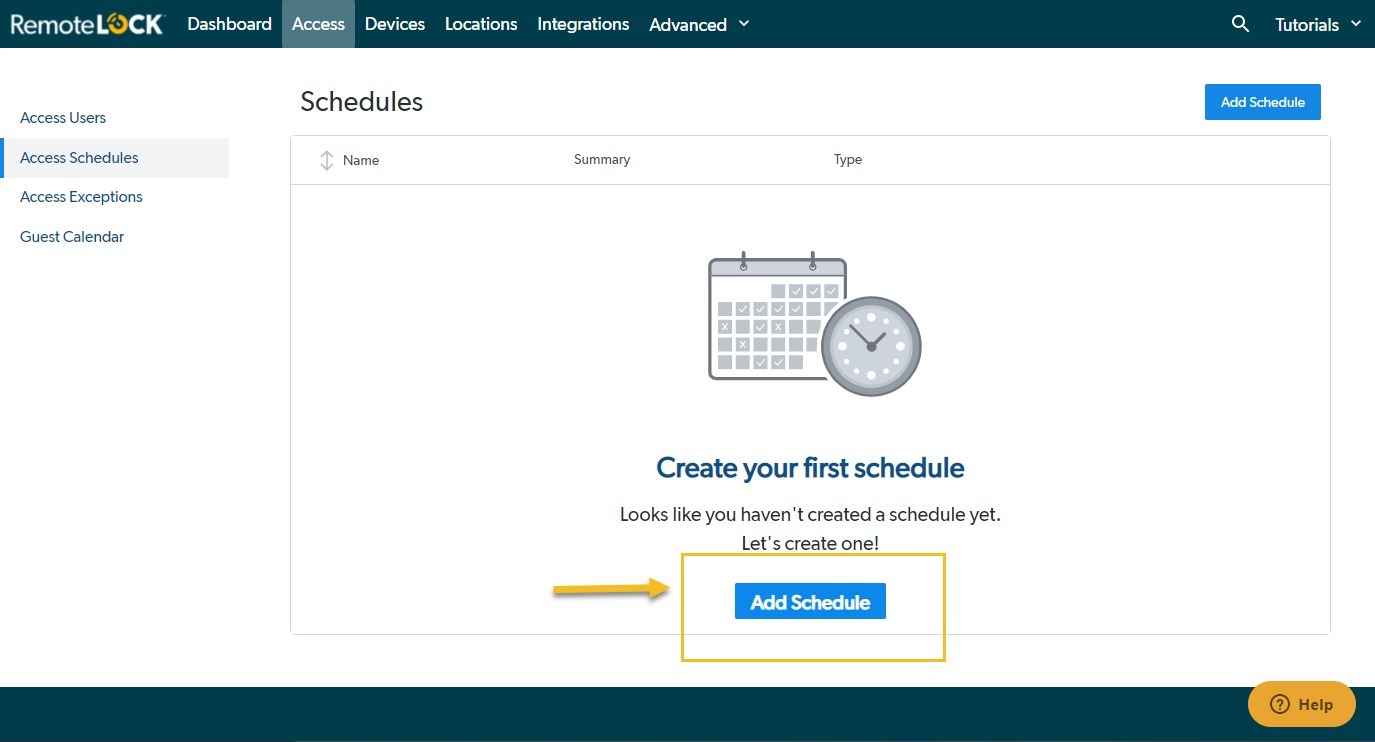
- To add a schedule, click on the Add Schedule button. A new page will appear with the Schedule Creator.

- Create a new schedule by entering the following:
Name
Select a unique name for your schedule. It also helps to include some detail about the schedule so it can be easily identified when applying to an Access User.
Access Exception
Access Exception schedules, also known as Holiday schedules, are optional and can be applied to an Access Schedule in order to restrict access during certain days. For example, a business may be closed on major US Holidays. So an Access Exception schedule can be created to include all of these dates. These can then be applied to an Access Schedule in order to deny access on these dates.
Information on creating Access Exception schedules and adding them to an Access Schedule is below.
Daily Schedule
Use the schedule creator to set access for each day of the week. Each access entry should have a starting and ending time. Multiple time ranges can be created for each day. For example, you can create a split shift for each day. In this case, you would have two time ranges for the day.
Schedule Creator Controls
The Access Schedule creator starts with a template for each day of the week. Leave a day empty to completely restrict access for that day. Below is an example of the schedule Monday - Friday, 9 AM to 5 PM.
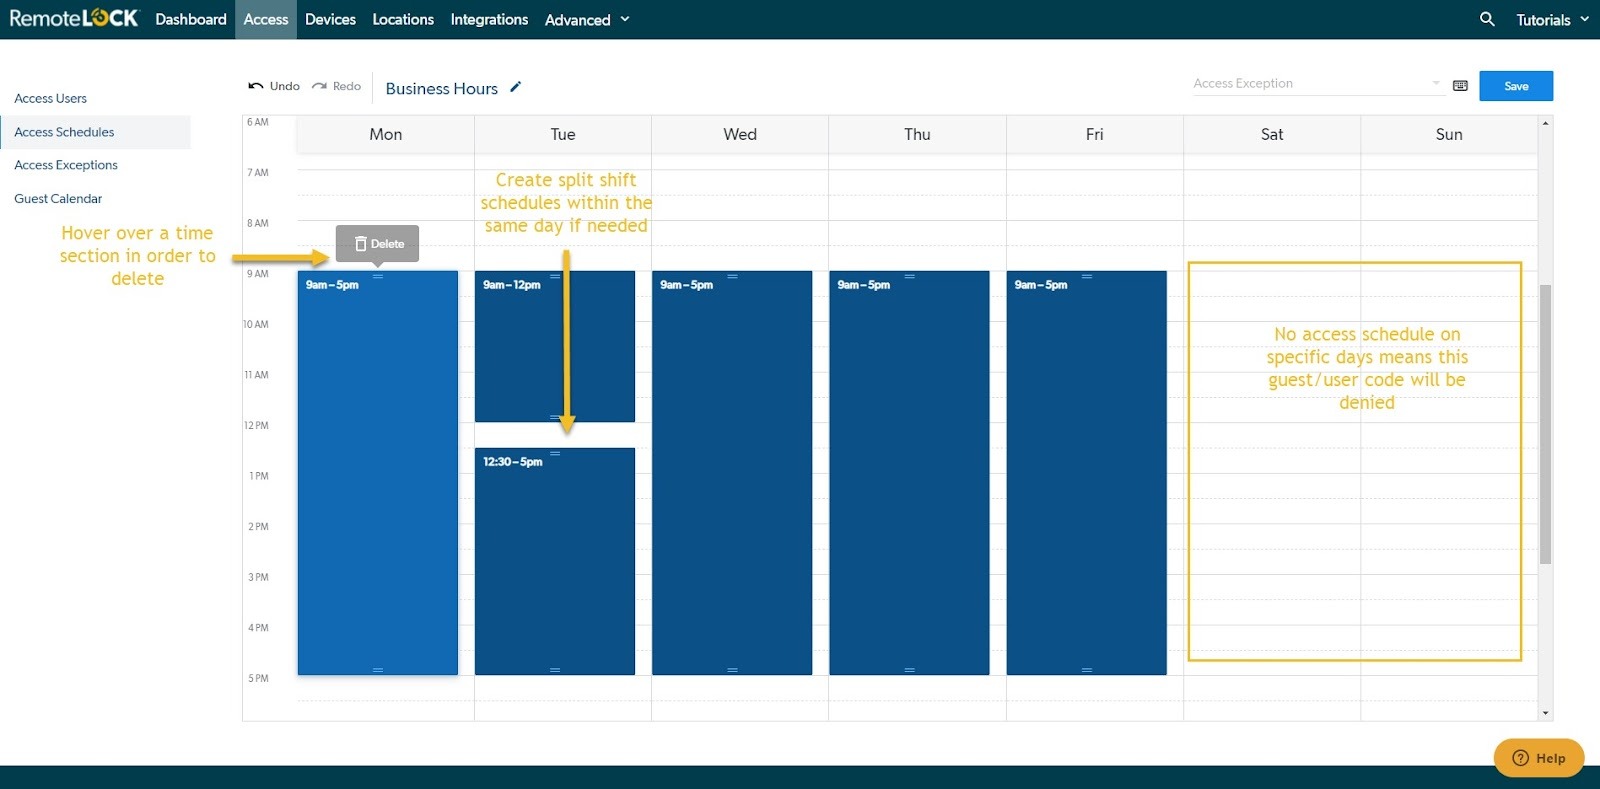
To add another schedule block within a day, click and drag the start and end times. To remove a schedule block, hover over the desired section to view the 'Delete' option. Days that do not have a scheduled time block will not allow access to the guest or user to whom the schedule is applied.
Assigning an Access Schedule
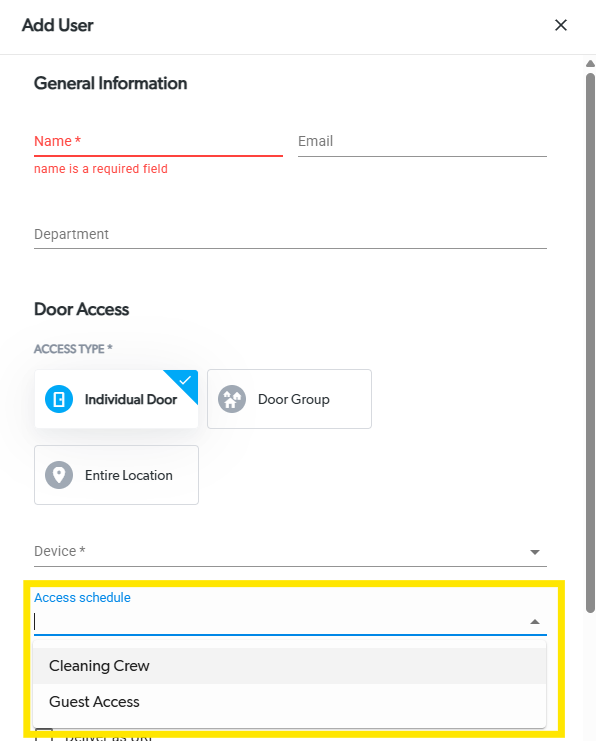
To have a Guest or User only be able to access the device during the proper Access Schedule, it is important to add the Access Schedule to the Guest or User Profile in the RemoteLock Portal.
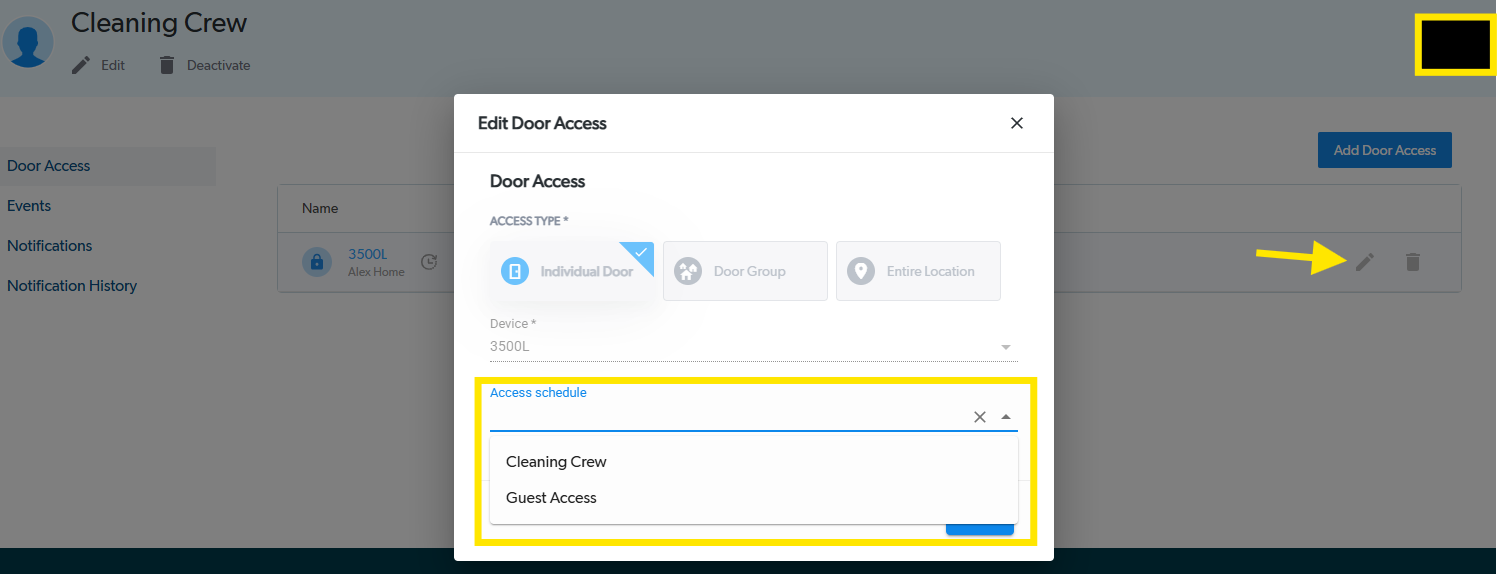
- To add an Access Schedule when creating a Guest or User for the first time, you can select the Access Schedule Drop Down list in the creation window to apply your Access Schedule to your Guest for their device.
- If you already have a Guest or User that exists in the RemoteLock Web Portal, you can select that Guest/User in the Access Tab, then edit their Access Schedules by selecting the Pencil Icon to the right of the device that you wish to assign this access schedule to.
Creating an Access Exception
Access Exception Schedules can be best described as “Holiday Hours”, in which you wish to apply your regular Access Schedule to your Users and Guests, but prohibit specific dates from using the same Schedule.
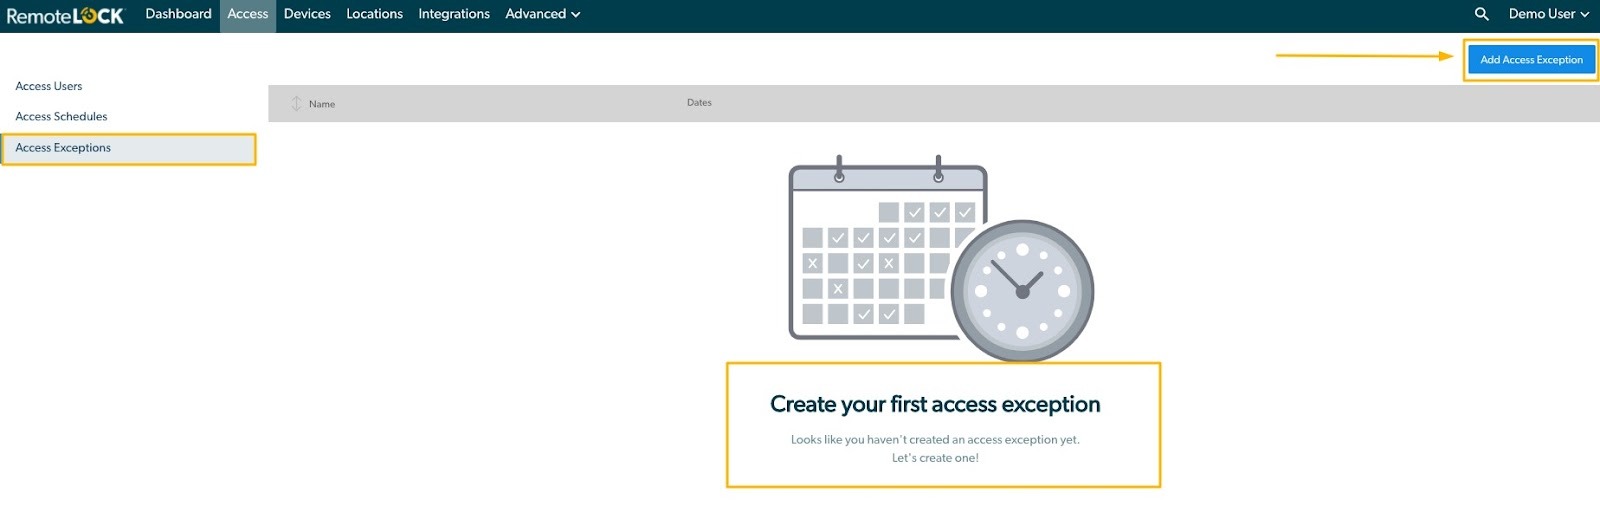
- Select the Access Exception tab. This tab shows a list of all existing schedules that have been created in the account, the option to edit them and create new Exception Schedules.
Access Exception schedules, also known as Holiday schedules, are optional and can be applied to an Access Schedule in order to restrict access during certain days. For example, a business may be closed on major US Holidays. So an Access Exception schedule can be created to include all of these dates. These can then be applied to an Access Schedule in order to deny access on these dates.
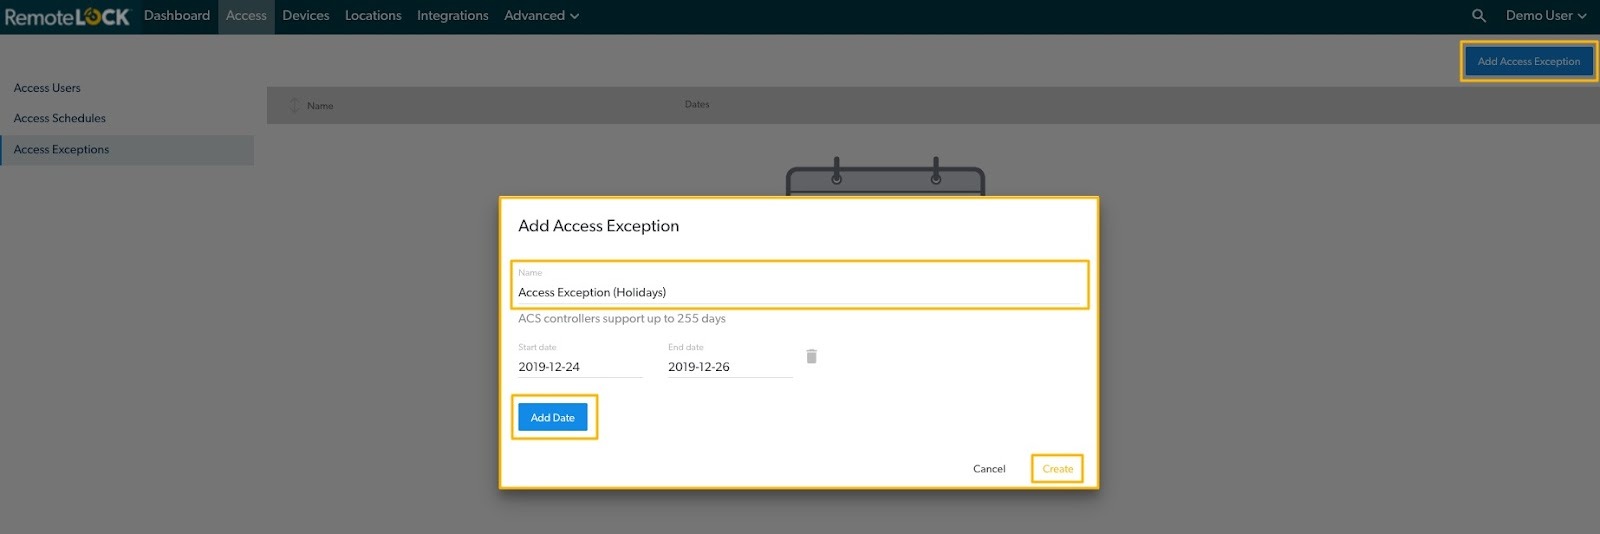
- To add a schedule, click on the Add Access Exception button. A pop-up window will appear with the Schedule Creator. Important information for Exception Schedules:
The maximum number of dates/date ranges in a schedule is 40.
If an Exception is created for a single day, enter the same day on the Start date and End date
The exception prohibits entry for the entire day(s) specified, starting at 12:00 AM and ending 24 hours later
After an Exception has been created, it can be edited or deleted from the Access Exceptions tab.

In order for the Access Exception Schedule to work with a user, you must add the Access Exception schedule to the Access Schedule itself.
Device Specific Limitations
Access schedules define when users or guests can unlock devices. Capabilities vary by device/brand:
Please follow the steps below to do so:
- From your dashboard screen, click "Access" at the top of the screen
- On the left side of this screen, click "Access Schedules"
- On this screen, click on the name of the schedule you would like to edit
- Towards the top right of the screen, click on the drop-down bar that says "Access Exception"
- This will give you a drop-down with the Access Exception schedules you created - select the Access Exception schedule you would like to tie to that schedule.
- Once you have selected the Access Exception schedule to tie to this Access Schedule, click "Save" in the top right corner.
- Now, as long as you have the Access Schedule programmed to that user or guest, then the Access Exception will be programmed to that user or guest as well.
Access Schedules can also be assigned to Common Door access in order to restrict access automatically applied to common doors to your selected schedule.
Back to Top^